Home/Quick checks/ID photo check
ID photo pre-flight check
Put the file you were about to submit on the light table. It reads format, file size, pixel dimensions, brightness, sharpness and edge margins, and tells you which of the six is most likely to trip.
The photo is handled inside your browser. It is not sent to a server and not written to local storage. There is no save, no history, no sharing and no report to download — close the tab and nothing of it remains. What it performs is a mechanical measurement, not Binance’s judgement.
INPUT · LIGHT TABLE
Binance’s own upload screen states Max 50 MB in .jpg/.jpeg/.png format, and this bench checks against the same line. Results appear the moment you pick a file; there is no submit button. On a phone, choose straight from your gallery — if the camera saved a HEIC, export it as JPG in the gallery first.
This browser could not read that image.
RESULT · READOUT
No photo selected 0/6 checks runPick an image and this panel fills in with format, file size, dimensions and ratio, brightness, sharpness and edge margins, plus what to change on each one that falls short.
- The six measures are: file format, file size, pixel dimensions and aspect ratio, overall brightness, sharpness, and edge margins.
- Once you pick an image this list is replaced by notes about that particular file. If the script never runs, the static checklist further down works without it.
This is a mechanical measurement, not a review decision. The image has not left this device and nothing has been stored. What counts in the end is the verification page inside your account and the review itself.
The same pass, by hand
Nothing below needs a script. Even if the bench above refuses to start on your device, working through this list covers everything here that you can check for yourself.
- Photograph the document itself, not a copy of it. A photocopy, a scan of a photocopy or a picture of a screen all read differently to a camera capture. This one is our own guidance rather than a line quoted off the page.
- Every field has to be readable, and the document has to be current. Worn corners, peeling lamination and an expiry date already behind you are not fixed by reshooting.
- Save it as .jpg, .jpeg or .png. The upload boxes in Binance’s own walkthrough carry the line
Max 50 MB in .jpg/.jpeg/.png format. HEIC from an iPhone and WebP from some Android cameras are not among those three; export as JPG from the gallery. The source for this is the first screenshot below. - Keep a single file under 50 MB. That ceiling is on the same line of small print, and the screen turns away anything above it. Smaller is not automatically better, though — a very small file is usually one a messaging app has recompressed, and the print goes soft. A few hundred KB up to a few MB is where we would keep it, and that part is our suggestion, not a platform rule.
- Aim for at least 900 pixels on the short side. The document number and the expiry date are small print; below a certain resolution no machine reads them and the file goes to a human instead.
- Shoot in ordinary light with the flash off. Flash on a laminated card leaves a white patch, and it can land right on the number. Indirect daylight near a window is the steadiest option.
- Look at the shot at full size before you accept it. Camera shake, focus that settled on the table, and shooting through a phone case all soften the edges.
- Leave a margin on all four sides. All four corners in frame, with a ring of desk around them. Cropping tight to the card reads as missing information.
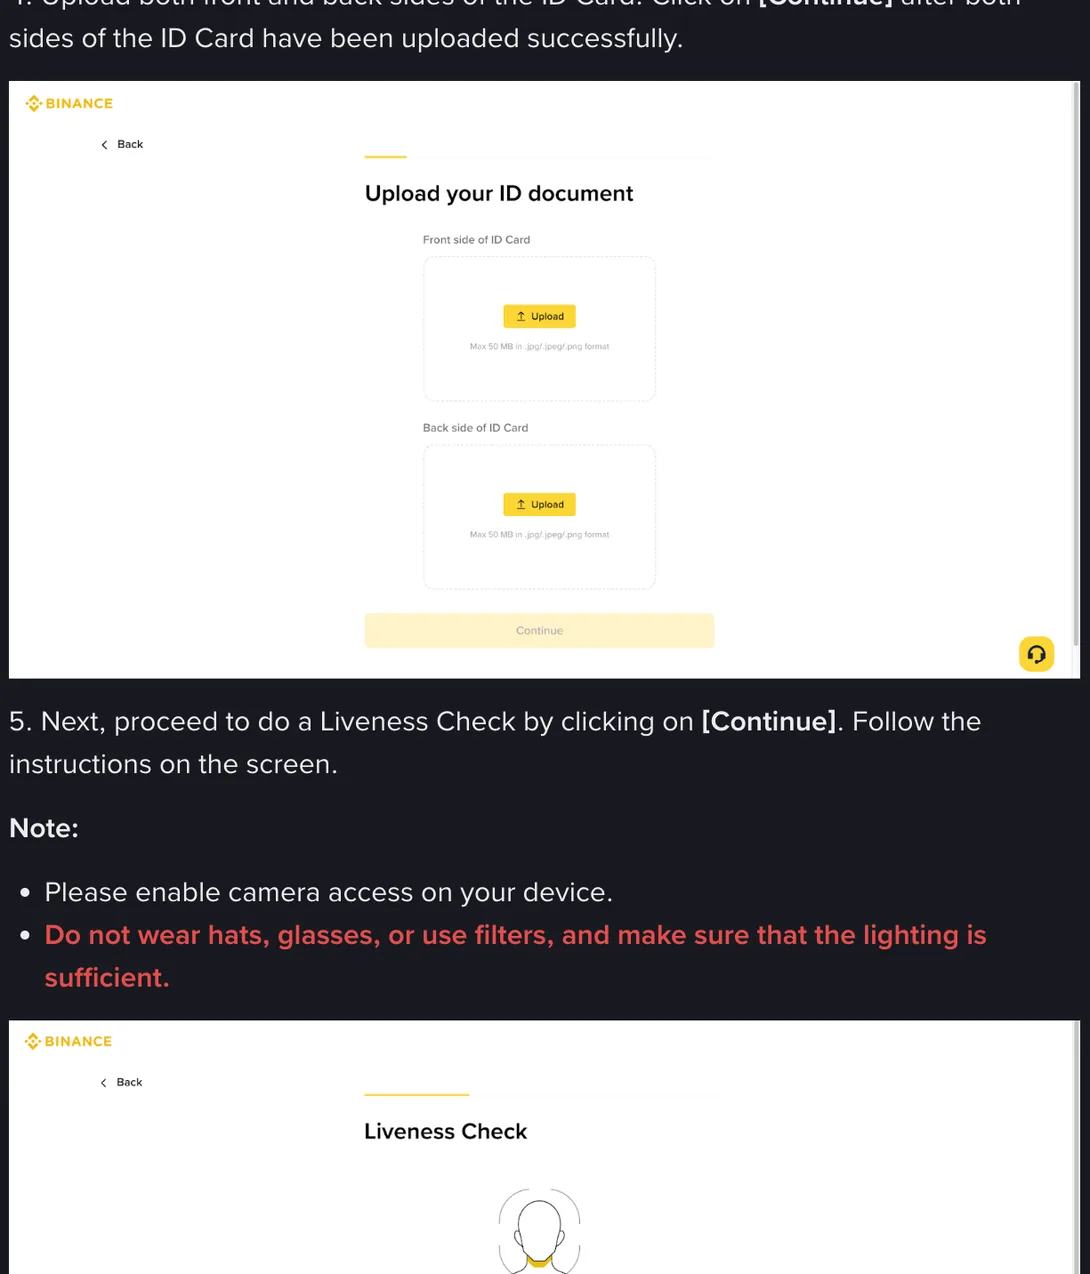
Upload your ID document, with boxes for Front side of ID Card and Back side of ID Card; the small print under each reads Max 50 MB in .jpg/.jpeg/.png format. Points 3 and 4 above come from that line. This example shows an ID card; other documents and other countries may look different, so trust the screen inside your own account. Screenshot taken 2026-09.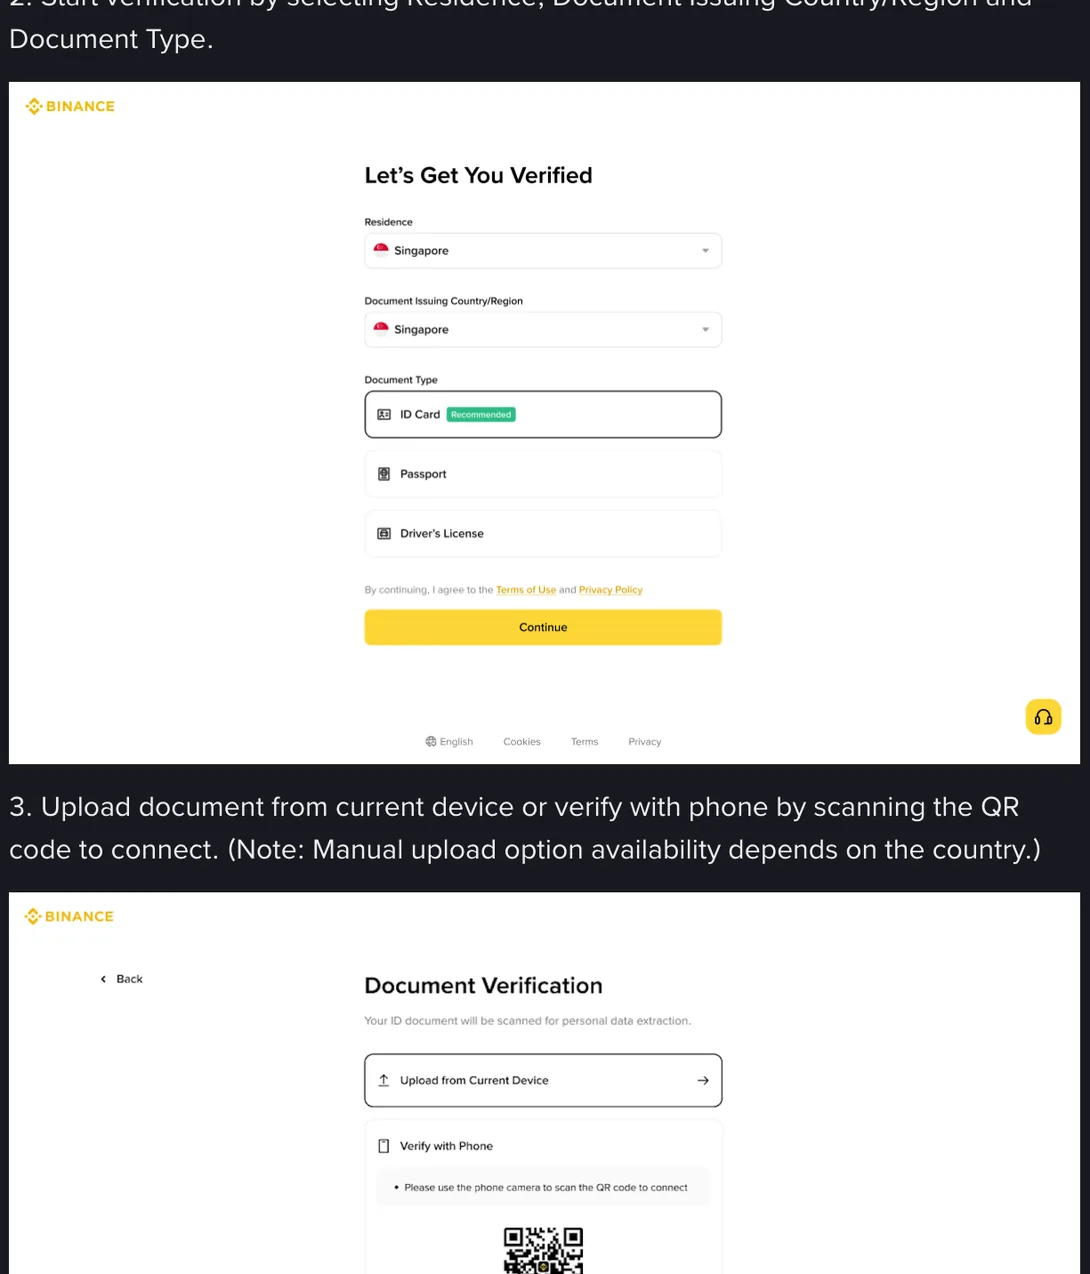
Start verification by selecting Residence, Document Issuing Country/Region and Document Type., and the screen offers three document types: ID Card (Recommended), Passport, Driver’s License. Which one you pick decides how many photographs you take. Screenshot taken 2026-09.Here are the bands the bench uses, if you would rather judge your own file by eye. The table is wide; on a phone you can scroll it sideways.
| Measure | OK | Borderline | Fix it |
|---|---|---|---|
| File format stated on the upload screen | .jpg, .jpeg or .png | A type the browser can’t name | WebP, HEIC, anything outside those three |
| File size ceiling official, rest ours | 80 KB to 8 MB | Under 80 KB, or 8 MB to 50 MB | Over 50 MB |
| Pixel dimensions | Short side above 900 | Short side 600 to 900 | Short side under 600 |
| Brightness | Mean 95 to 245, blown highlights under 8% | Mean 70 to 95, or blown highlights 8% to 25% | Mean below 70 or above 245, or blown highlights over 25% |
| Sharpness | Laplacian variance above 200 | 60 to 200 | Under 60 |
| Edge margins | All four bands clear | One side tight | Two or more sides tight |
Only two rows here are copied off Binance’s own screen: the three accepted formats, and the 50 MB ceiling on one file. Those are also the only two whose thresholds have a source. The other four — dimensions, brightness, sharpness, margins — reach a Fix it verdict against thresholds this site has chosen, not against a line anybody at Binance has drawn. The 8 MB mark is ours as well, which is why it only ever produces Borderline and never blocks you.
Brightness is read as two numbers: the mean grey value (0 to 255, which says how dark the frame is overall) and the proportion of pixels above 250 that hold no detail left, which says how bad the glare is. Judging overexposure on the mean alone punishes the wrong files — a white card lying on a pale desk sits around 230 by nature and there is nothing wrong with it. Sharpness is the variance of a Laplacian over the greyscale image; higher means crisper edges. All of these are intermediate figures the bench works out for itself. Binance never shows you anything of the kind; it tells you passed or not.
Open: how to use this, and where each measure comes from
The problem it addresses
When an ID photo comes back, the message is usually a few words long — the image is unclear, please upload again. Whether it was soft, dark, or cropped through a corner is left to you. Guess wrong and you spend another round in the queue. This bench settles the part that can be measured locally: right format, big enough, bright enough, sharp enough, and not cropped to the edge. Anything it flags as a hard fault is a reshoot, not a gamble on a review.
Using it
Open the file picker on the light table and choose an image you have already prepared. The result appears immediately; there is nothing to submit and nothing to wait for. The card gives you a verdict and a count at the top, a thumbnail and a brightness histogram in the middle, six bars for the six measures below that, and then notes written for your particular file. Choose a different image to run it again — the previous one leaves no trace.
Where the six come from
Two of them have a documented source. The upload boxes in Binance’s identity verification walkthrough both carry Max 50 MB in .jpg/.jpeg/.png format, which is where the accepted formats and the size ceiling come from. A file outside those three types, or above 50 MB, gets a hard verdict here because the screen itself turns it away.
Keep the two layers apart, though. “Too big to be sensible” and “above 50 MB and therefore blocked” are different claims. We do suggest keeping the file between a few hundred KB and a few MB: large files are the ones that die halfway through an upload on a weak mobile connection, and there is no benefit to them. Very small ones have usually been through a messaging app and the print has gone soft. But that is our own advice, not a Binance rule, so anything between 8 MB and 50 MB is marked Borderline here and never marked as a likely rejection. Passing off a preference as a platform rule sends people off to reshoot for no reason, and we hold that line firmly.
The remaining four — dimensions and aspect ratio, brightness, sharpness, margins — have no official numbers behind them. The thresholds for those are settings chosen for this bench: a short side under 900 pixels, a mean brightness under 70, or a Laplacian variance (a standard blur measure) under 60, and it starts to flag the file, for print that may be too small to read, a frame that is too dark, or edges that have gone soft. Treat those as a self-check, not as Binance’s line, and let the verification page inside your account settle what actually passes.
The margin measure works like this. It estimates the background from four small corner patches, then looks at each of the four edge bands for two things: how many pixels in the band depart from that background, and how much the band varies within itself. A clean margin gives low numbers on both. Text, the border of the card, or the card itself intruding into the band pushes the second number up straight away. It is most reliable on the obvious composition — a card lying flat with background all round. Patterned tablecloths, dark backgrounds, or a frame that is a single field of noise will confuse it in both directions.
Data and privacy
The image check runs through the browser’s own FileReader and canvas on your device. Your image and its pixels stay inside the tool: they are not uploaded to or analysed by us. The page separately uses Google Analytics 4 (GA4) for visit statistics, as explained in the privacy policy. The tool writes nothing to localStorage and has no save, history, share or export function; refresh the page to clear the current result.
What it cannot do for you
It cannot tell whether you are photographing the document or a copy of it, whether the document has expired, whether the name matches what you typed on the form, or whether that document is accepted where you live. It certainly cannot predict a review, which involves people and risk systems the bench never touches. A verdict of nothing obviously wrong means only that six mechanical measures came back clean.
Who it suits
Two sorts of reader. Someone who hasn’t submitted yet and wants one careful look first, and someone already sent back once who can’t tell from the message which part was at fault. If the reason you were turned down was a name mismatch, an unacceptable address document, or the liveness check, this is the wrong bench — the matching sheet will get you there faster.
Read alongside
The bench names the measure that fell short; how to photograph your ID covers the reshoot. If you have been sent back and don’t know what to change, start at 12 reasons and fixes. Still deciding which document to use — passport, ID card or driving licence. The address side has a sheet of its own: what counts as proof of address.