| Screen | What the people who fail here are doing |
|---|---|
| 1 · Residence, issuing country, document type | Setting all three to the same country out of habit |
| 2 · Upload from this device, or scan a QR code | Walking away from a half-finished flow because the phone is in another room |
| 3 · Front and back of the document | Uploading one side, then hunting for a Continue button that is waiting for the other |
| 4 · Liveness recording | Sitting with a window behind them, glasses on, at nine in the evening |
| 5 · Confirm Information | Checking the fields against memory rather than against the card on the desk |
| 6 · Under review | Refreshing, then submitting a second time, which helps nobody |
Six screens, six different ways of losing an evening. This page does not repeat the official steps, which are on Binance’s own help page and are perfectly clear; it goes screen by screen through where people actually come off, what the interface says at that moment, and what to do before touching Continue. It assumes the account itself already exists, since opening one is a separate job.
Screen 1: three dropdowns that set up everything after them
Nothing is uploaded here. You answer three questions, and those three answers decide the shape of every screen that follows. The help page describes the step in one line:
2. Start verification by selecting Residence, Document Issuing Country/Region and Document Type.
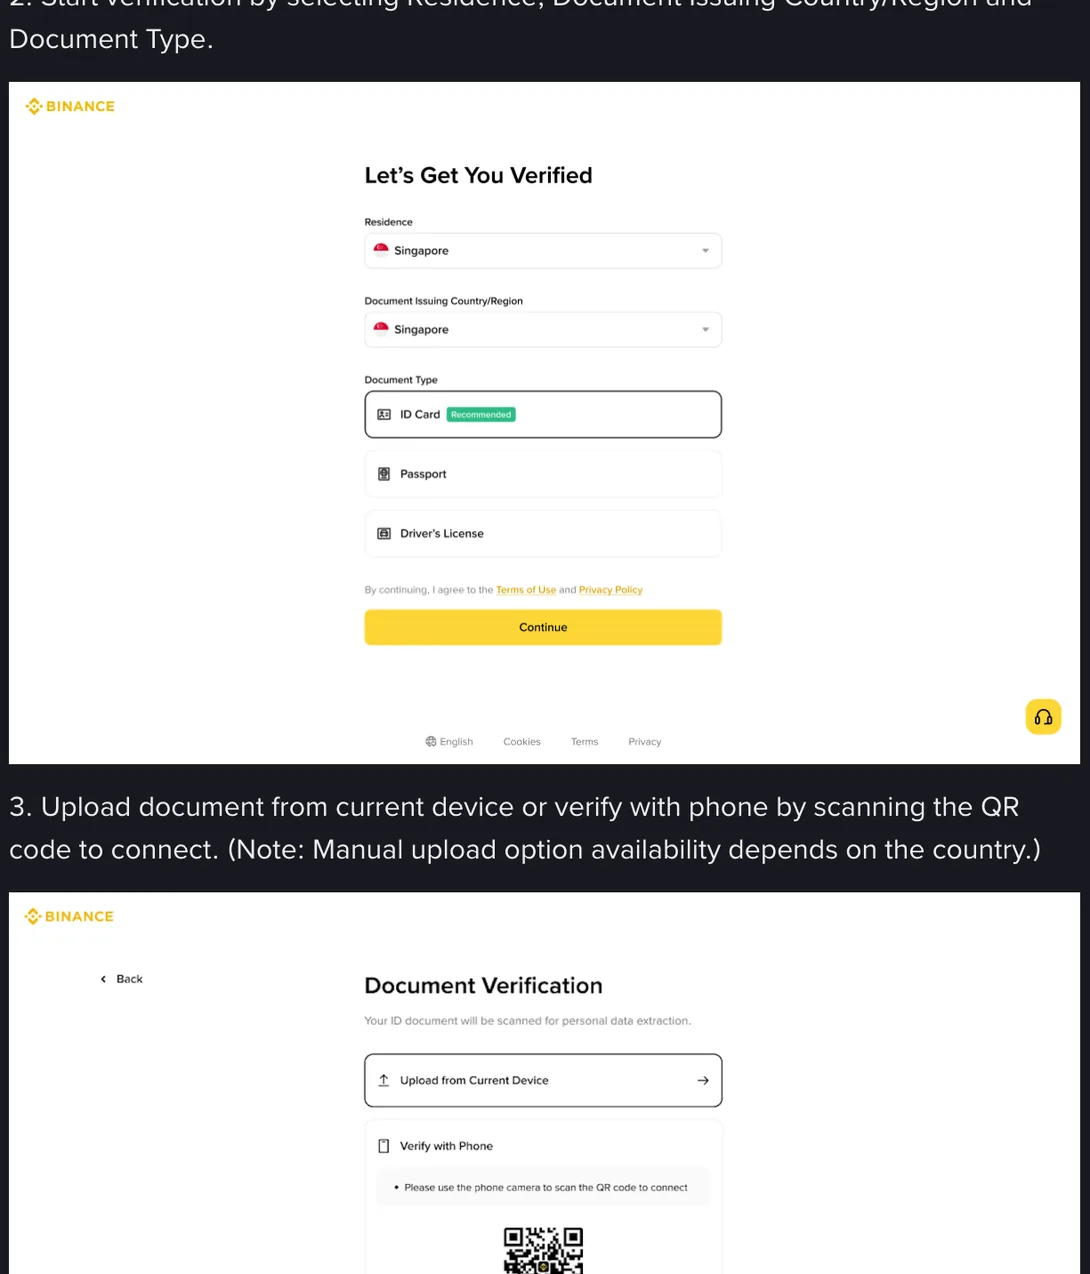
Residence and Document Issuing Country/Region are separate boxes because they are allowed to differ, and for a large share of readers here they do: a Pakistani on a CNIC working in Doha, a Kenyan studying in Adelaide, an Indian on a passport living in Johannesburg. Residence is where you live now. Issuing country is whatever is printed on the card in your hand. Setting them to the same value because the question felt repetitive can make screen three impossible, since the checker will then be reading a document from one country against another country’s layout.
Then the document type, three options, with ID Card tagged Recommended in green. That tag is a default, not a reading of your situation. Australia has no national ID card, so the realistic choice there is a passport or a driving licence. In Pakistan the CNIC is the ID card. In South Africa it is the Smart ID card, and the old green barcoded book is a different thing. Kenyan readers usually have the national ID or a passport. In India the drawer typically contains three or four candidates, and the right one is whichever is current and photographs cleanly.
Write the three answers on a scrap of paper before opening the page, because they are the only choices in the whole flow that are expensive to get wrong and free to think about in advance.
Screen 2 wants to know which device the file is coming from
Two routes: upload from the machine you are sitting at, or scan a QR code and continue on a phone. The help page adds a qualification that people skip:
3. Upload document from current device or verify with phone by scanning the QR code to connect. (Note: Manual upload option availability depends on the country.)
That last bracket is worth a second. Whether the manual upload option exists at all depends on where you are, so the two-route choice may turn out to be a one-route instruction. If your country is in that group, the flow is going to the phone whether you planned it or not.
Practical consequence: have the phone next to you, charged, before you start. This is the only step in the sequence that can hand you across devices, and the number of half-finished cases that die here because somebody went to look for a charger is larger than it should be. If you are on a phone from the beginning, the question does not arise.
Screen 3: two boxes, front and back
The upload screen has two separate boxes, one for each side of the card, and a line of small print under each of them.
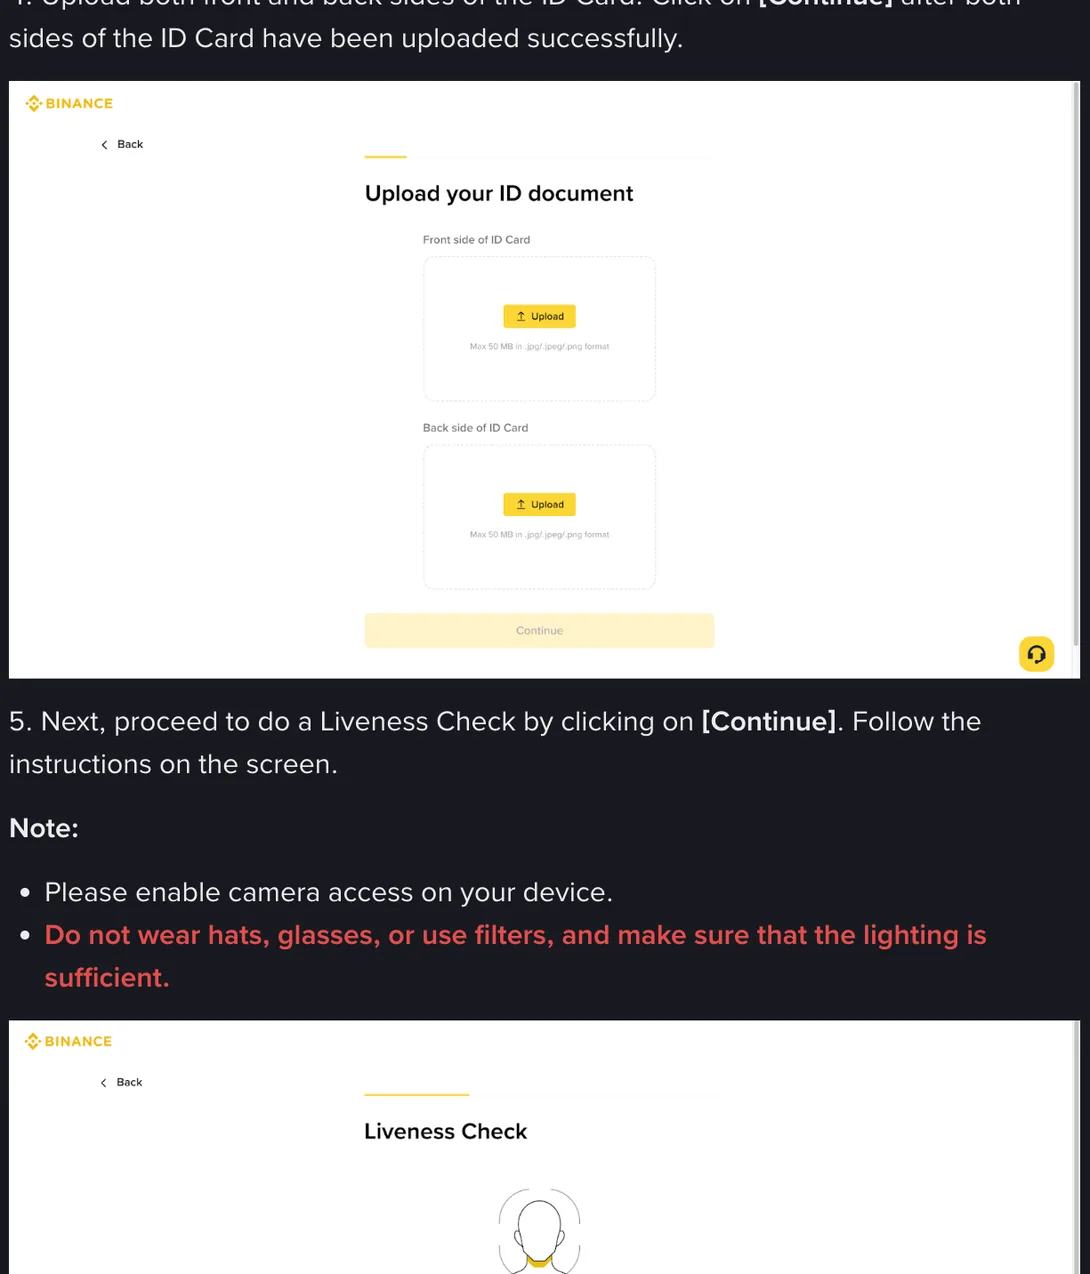
Max 50 MB in .jpg/.jpeg/.png format
Fifty megabytes, in three image formats. Tutorials all over the web insist the limit is two megabytes; the interface says otherwise. That does not make a huge file a good idea, because a large upload on a shared evening connection is the one most likely to break halfway, but it does mean you can stop compressing a photograph until it looks like a fax.
The step text is equally literal about the other trap:
4. Upload both front and back sides of the ID Card. Click on [Continue] after both sides of the ID Card have been uploaded successfully.
Both. People upload the front, then look for a button that is deliberately doing nothing, and conclude the page has hung. It has not. The second box is empty. Passport users have the opposite version of the confusion, expecting to be asked for two sides when the data page is the only page that matters.
What gets a document rejected at this screen is nearly always physical rather than technical. Glare from a lamp landing across the ID number, so those characters stop existing for the reader. A corner cut off by tight framing. A card photographed inside its plastic sleeve. A photo of a photocopy, or of another screen. Take the card out of the wallet, put it on a dark matte surface, switch off flash and any auto-enhancement, and shoot from directly overhead with all four corners inside the frame. Then do the second side in the same sitting, in the same light, so the two files look like the same document.
Worth separating two events that feel like one here. Getting a file accepted and getting it read correctly are not the same thing: the upload succeeding tells you nothing about whether the name and number came out cleanly, and you will not find out until screen five. Which makes this the cheapest moment in the whole flow to shoot a better picture, because nothing downstream has happened yet.
Screen 4 records you
Next is the liveness check, and it is a recording rather than a photograph. There is no screen anywhere in this flow that asks you to hold your card up beside your face, which is worth knowing for a reason that has nothing to do with verification: anybody who asks you for that photo by message is not from Binance.
Before it starts, the help page puts a note and then a line in red:
Please enable camera access on your device.
Do not wear hats, glasses, or use filters, and make sure that the lighting is sufficient.
The first of those explains most of the cases where nothing happens at all: a black rectangle, or a camera that never wakes up. That is a browser permission problem, and it is especially common when the link was opened inside a chat app’s built-in browser rather than in Chrome or Safari.
The second explains most of the cases where something happens and it fails anyway. Glasses turn into two white rectangles under indoor light. A ceiling bulb on its own leaves the eye sockets in shadow. And backlight, which is the largest single cause, turns your face into a silhouette the moment the camera meters for the window behind you. Turn around so the light falls on your face, take the glasses off before you begin, and prop the phone up rather than holding it.
Failing here does not throw away the document you uploaded a minute ago; the flow is sequential and you are stuck on one step, not sent back to the start. The full set of causes, including the ones specific to older Android handsets and weak connections, is on the liveness page.
Screen 5: the last screen you can still edit
This is the screen that matters most and gets the least attention, because by now you have taken photographs, sat in front of a camera, and stopped reading.
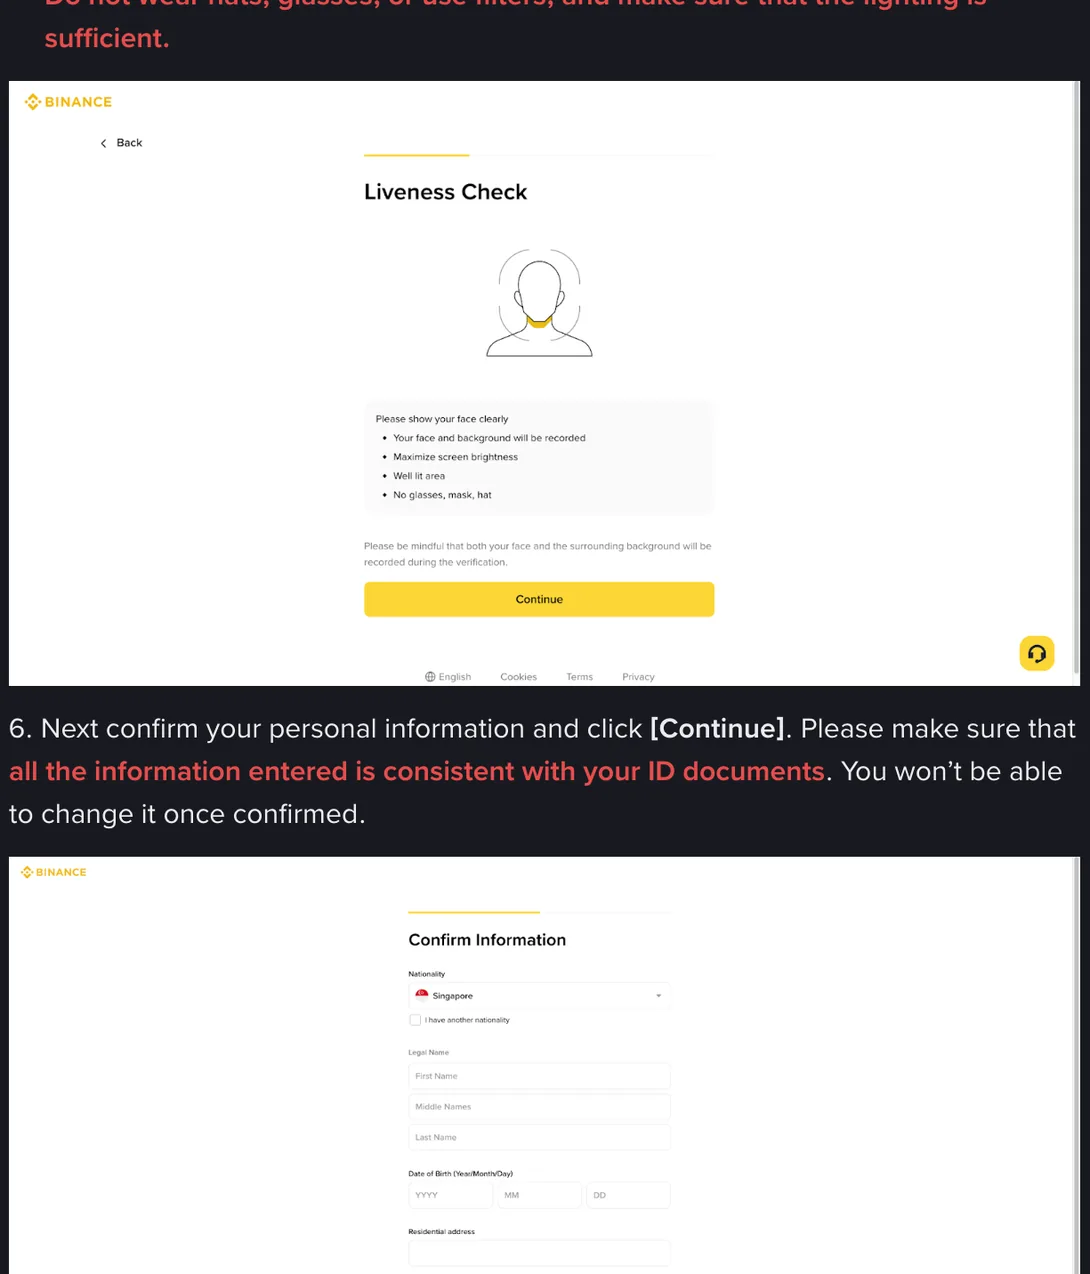
The instruction attached to it is two sentences, and both of them matter:
6. Next confirm your personal information and click [Continue]. Please make sure that all the information entered is consistent with your ID documents. You won’t be able to change it once confirmed.
The second half is the one that gives you a small fright. The first half is the one to act on, because it carries the instruction: consistent with your ID documents, meaning the object on the desk, not your memory of it.
What is on this screen was mostly not typed by you. It was extracted from the photographs you uploaded two screens ago, which is why a smudged number matters here rather than there. The fields are Nationality with a checkbox for a second one, Legal Name split into First, Middle and Last, Date of Birth in three selectors, then residential address, postal code and city.
Three things to check against the card, in this order. The name, character by character, including middle names you never say out loud and any part of the spelling you personally dislike. The date of birth, because your card almost certainly prints the day first and the selectors want year, then month, then day; a birthday written 05/09 becomes a different day entirely if you copy it straight across. Then the document number, watching the three pairs that always cause it: letter O against digit 0, letter I against digit 1, letter S against digit 5.
Names that do not fit a First-Middle-Last shape need a decision rather than a guess: a single name with no surname, a South Indian name carrying a father’s initial, an Arabic name in four parts. Use what your passport’s data page prints, and do not invent a surname to fill an empty box. Which of these fields stop being yours to edit after this click is set out in the page on fields you cannot change.
Screen 6 hands you two different numbers
After Continue there is nothing left for you to do. The screen says the case is under review and tells you the result will arrive by email or app notification, which means you do not have to sit watching the page.
There are two numbers in circulation about how long this takes, and both come from Binance. The waiting screen shows an estimated time of fifteen minutes. The help page’s own answer, further down in its list of questions, says submitted documents are usually reviewed within 48 hours and that some cases take longer. They are not contradicting each other: one describes an automated pass, the other includes the cases that get handed to a person. The screenshots for both, and what pushes a case onto the slow path, are on the review time page.
The one thing to avoid here is submitting again out of impatience. A second submission does not overtake the first.
The wait is also the right moment to keep the whole exercise in proportion. What you put into crypto afterwards can come back as a fraction of itself, or as nothing at all, and a clean verification record has never softened that.
Where proof of address comes in, if it does
Nothing in those six screens asked for a utility bill, and it is easy to read that as never being asked. Proof of address sits outside this flow. It can be requested later, at a different point, and whether it is requested at all depends on where you live.
What that means practically: do not go hunting for a bill before you start, and do not treat the absence of the request as a permanent answer. If and when it arrives, the accepted document list, the ones that are never accepted, and the per-country validity window are all on the proof of address page. The short version for anyone in a hurry is that a bank statement in your own name, downloaded this month, is the place to start.
If it has already come back rejected
You may be reading this after the fact, having been told the verification failed and not which part of it did. Reading the six screens again is not the fastest route in that situation. Sorting by the message you were given is: the twelve rejection causes are arranged so that you find yours, change that one thing, and submit again, rather than repeating the whole sequence and hoping.
One boundary to leave you with. Which of these six screens your own flow puts in front of you is a local setting and it gets rebuilt, so the live page outranks any guide, this one included, and nothing here is legal or investment advice.
Do the six screens once, in one sitting, with the card on the desk and the window in front of you.